Light path diagnostics LEDs

The tables in this section describe the light path diagnostic LEDs in the PCIe Expansion Node and suggested actions to correct detected problems.

See the Installation and Service Guide for the compute node for more information about troubleshooting the compute node.
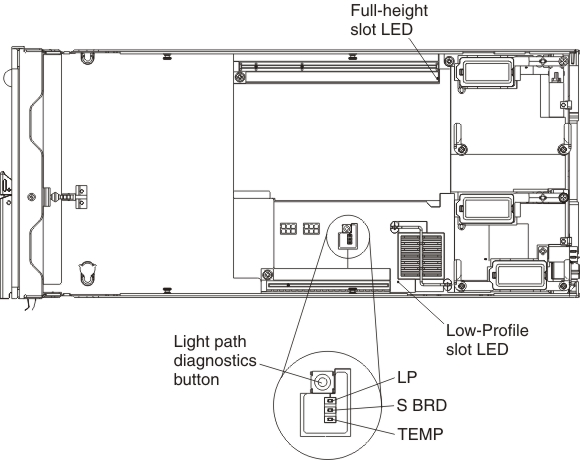
System board

The following illustration shows the location of the light path diagnostics button and LEDs on the PCIe Expansion Node system board. Press the light path diagnostics button to identify faults in the PCIe Expansion Node.


Graphic illustrating the light path diagnostics LEDs on the PCIe Expansion Node system board
Table 1. Light path diagnostics LEDs on the PCIe Expansion Node system board
  • Follow the suggested actions in the order in which they are listed in the Action column until the problem is solved.
  • See Parts listing - PCIe Expansion Node to determine which components are customer replaceable units (CRU) and which components are field replaceable units (FRU) that must be replaced only by a trained service technician.
  • If an action step is preceded by "(Trained service technician only)," that step must be performed only by a trained service technician.
Lit light path diagnostics LED Description Action
LP Light path charge good/power indicator LED (green) illuminates to indicate that the system has a charge available for illuminating the internal light path LEDs If the power button on the front of the compute node or the PCIe Expansion Node internal light path push button does not illuminate the charge good/power LED, replace the PCIe Expansion Node system board. See Replacing the system board for instructions.
S BRD System board LED (amber) illuminates to indicate a fault in one of the monitored components on the expansion node system board.
Possible system board errors:
  • Undercurrent or overcurrent event
  • Loss of dc power
  • Critical PCIe switch error
  • UEFI failure of a system board component
  1. Check the event logs for expansion node system board events and perform the corrective actions indicated.
  2. Reseat the full-height PCIe riser, the low-profile PCIe rise, and the interposer cable.
  3. Reinstall the node and power it on. If the S BRD LED persists, replace the expansion node system board. See Replacing the system board for instructions.
TEMP Over temperature LED (amber) illuminates to indicate a thermal fault in the PCIe Expansion Node
The over temperature LED indicates that a temperature fault has occurred in the PCIe Expansion Node. If this indicator is illuminated, it does not indicate that any specific part needs replacing, only that there was a critical thermal event.
  1. Check the event logs for thermal events in the chassis and perform the corrective actions indicated.
  2. Check the chassis cooling fans (fans in the rear, air inlets in front).
  3. Check the room temperature.
  4. Make sure that either a PCIe adapter or a PCIe filler is installed in every slot.
  5. Remove and reinstall the node; then, check to see if the thermal event reoccurs.
Note: Using unsupported PCIe adapters might cause a thermal fault in the expansion node.
Full-height slot LED Full-height slot LED (amber) illuminates to indicate a fault in the full-height PCIe riser
The full-height PCIe riser is not installed or might not be seated correctly.
  1. Install a full-height PCIe riser, if one is not already installed. SeeInstalling the full-height PCIe riser.
  2. Remove the full-height PCIe riser and reseat the full-height adapters or slot fillers; then, reseat the full-height PCIe riser.
  3. Replace the full-height PCIe riser. See Removing the full-height PCIe riser and Installing the full-height PCIe riser.
Low-profile slot LED Low-profile slot LED (amber) illuminates to indicate a fault in the low-profile PCIe riser
The low-profile PCIe riser is not installed or might not be seated correctly.
  1. Install a low-profile PCIe riser, if one is not already installed. SeeInstalling the low-profile PCIe riser.
  2. Remove the low-profile PCIe riser and reseat the low-profile adapters or slot fillers; then, reseat the low-profile PCIe riser.
  3. Replace the low-profile PCIe riser. See Removing the low-profile PCIe riser and Installing the low-profile PCIe riser.

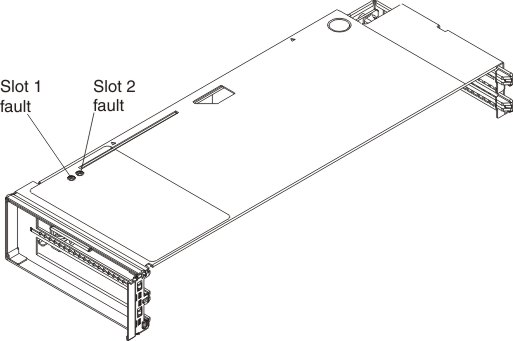
Full-height PCIe riser

The following illustration shows the location of the light path LEDs on the PCIe Expansion Node full-height PCIe riser.


Graphic illustrating the light path diagnostics LEDs on the PCIe Expansion Node full-height PCIe riser
Table 2. Light path diagnostics LEDs on the PCIe Expansion Node full-height PCIe riser
  • Follow the suggested actions in the order in which they are listed in the Action column until the problem is solved.
  • See Parts listing - PCIe Expansion Node to determine which components are customer replaceable units (CRU) and which components are field replaceable units (FRU) that must be replaced only by a trained service technician.
  • If an action step is preceded by "(Trained service technician only)," that step must be performed only by a trained service technician.
Lit light path diagnostics LED Description Action
Slot 1 fault PCIe slot 1 LED (amber) illuminates to indicate an adapter fault in full-height PCIe riser slot 1
The compute node is unable to establish a path to the adapter in PCIe slot 1, no adapter or filler is installed in PCIe slot 1, or the PCIe adapter or filler might not be seated correctly.
  1. Install an adapter or a filler in PCIe slot 1, if one is not already installed. See Installing a full-height adapter.
  2. Reseat the adapter or filler in PCIe slot 1.
  3. Replace the adapter in PCIe slot 1. See Removing a full-height adapter and Installing a full-height adapter.
Slot 2 fault PCIe slot 2 LED (amber) illuminates to indicate an adapter fault in full-height PCIe riser slot 2
The compute node is unable to establish a path to the adapter in PCIe slot 2, no adapter or filler is installed in PCIe slot 2, or the PCIe adapter or filler might not be seated correctly.
  1. Install an adapter or a filler in PCIe slot 2, if one is not already installed. See Installing a full-height adapter.
  2. Reseat the adapter or filler in PCIe slot 2.
  3. Replace the adapter in PCIe slot 2. See Removing a full-height adapter and Installing a full-height adapter.

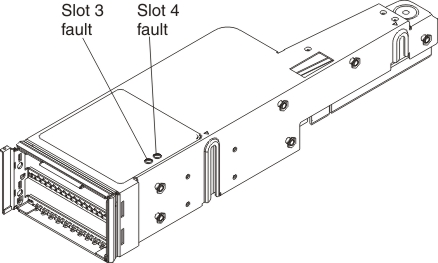
Low-profile PCIe riser

The following illustration shows the location of the light path LEDs on the PCIe Expansion Node low-profile PCIe riser.


Graphic illustrating the light diagnostics LEDs on the PCIe Expansion Node low-profile PCIe riser
Table 3. Light path diagnostics LEDs on the PCIe Expansion Node low-profile PCIe riser
  • Follow the suggested actions in the order in which they are listed in the Action column until the problem is solved.
  • See Parts listing - PCIe Expansion Node to determine which components are customer replaceable units (CRU) and which components are field replaceable units (FRU) that must be replaced only by a trained service technician.
  • If an action step is preceded by "(Trained service technician only)," that step must be performed only by a trained service technician.
Lit light path diagnostics LED Description Action
Slot 3 fault PCIe slot 3 LED (amber) illuminates to indicate an adapter fault in low-profile PCIe riser slot 3
The compute node is unable to establish a path to the adapter in PCIe slot 3, no adapter or filler is installed in PCIe slot 3, or the PCIe adapter or filler might not be seated correctly.
  1. Install an adapter or a filler in PCIe slot 3, if one is not already installed. See Installing a low-profile adapter.
  2. Reseat the adapter or filler in PCIe slot 3.
  3. Replace the adapter in PCIe slot 3. See Removing a low-profile adapter and Installing a low-profile adapter.
Slot 4 fault PCIe slot 4 LED (amber) illuminates to indicate an adapter fault in low-profile PCIe riser slot 4
The compute node is unable to establish a path to the adapter in PCIe slot 4, no adapter or filler is installed in PCIe slot 4, or the PCIe adapter or filler might not be seated correctly.
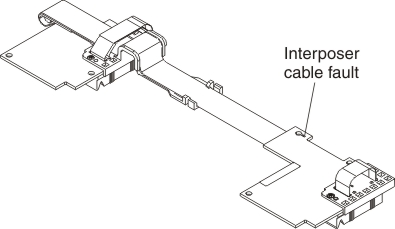
  1. Install an adapter or a filler in PCIe slot 4, if one is not already installed. See Installing a low-profile adapter.
  2. Reseat the adapter or filler in PCIe slot 4.
  3. Replace the adapter in PCIe slot 4. See Removing a low-profile adapter and Installing a low-profile adapter.

Interposer cable

The following illustration shows the location of the light path LED on the PCIe Expansion Node interposer cable.


Graphic illustrating the light diagnostics LED on the PCIe Expansion Node interposer cable
Table 4. Light path diagnostics LED on the PCIe Expansion Node interposer cable
  • Follow the suggested actions in the order in which they are listed in the Action column until the problem is solved.
  • See Parts listing - PCIe Expansion Node to determine which components are customer replaceable units (CRU) and which components are field replaceable units (FRU) that must be replaced only by a trained service technician.
  • If an action step is preceded by "(Trained service technician only)," that step must be performed only by a trained service technician.
Lit light path diagnostics LED Description Action
Interposer cable Interposer cable LED (amber) illuminates to indicate an interposer cable fault
There is a fault in the interposer cable.
  1. Reseat the interposer cable.
  2. If the fault persists, replace the interposer cable. See Removing the interposer cable and Installing the interposer cable.
Interposer cable LED (amber) flashes to indicate a communication fault
The interposer cable is unable to communicate with the compute node.
  1. Reseat the interposer cable.
  2. If the fault persists, replace the interposer cable. See Removing the interposer cable and Installing the interposer cable.

I/O expansion adapters

The I/O expansion adapters might also have an on-board fault LED (amber) that illuminates to indicate a fault in the I/O expansion adapter. Complete the following steps to troubleshoot an I/O expansion adapter fault:
  1. Reseat the I/O expansion adapter.
  2. If the fault LED persists, replace the I/O expansion adapter. See Removing an I/O expansion adapter and Installing an I/O expansion adapter.