Installing an I/O expansion adapter

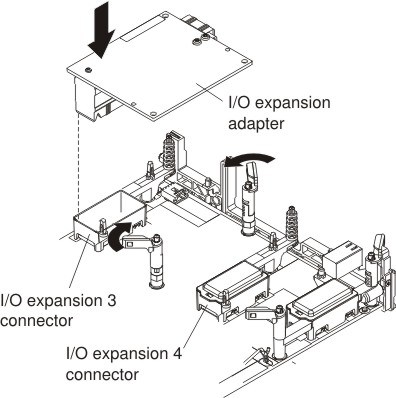
Use these instructions to install an I/O expansion adapter in the PCIe Expansion Node.

Before installing an I/O expansion adapter in the PCIe Expansion Node, read Safety and Installation guidelines.

Statement 21
Graphic illustrating Safety Statement 21

CAUTION:
Hazardous energy is present when the blade is connected to the power source. Always replace the blade cover before installing the blade.

To install an I/O expansion adapter in the PCIe Expansion Node, complete the following steps:

  1. Locate the system board I/O expansion adapter connectors (see System board connectors).
  2. Remove the plastic cover from the I/O expansion connector, if one is present.
  3. Touch the static-protective package that contains the I/O expansion adapter to any unpainted metal surface on the Flex System Enterprise Chassis or any unpainted metal surface on any other grounded rack component; then, remove the adapter from the package.
  4. Open the retention clips.

    Graphic illustrating installing an I/O expansion adapter
  5. Orient the plug on the I/O expansion adapter to the I/O expansion 3 or I/O expansion 4 connector on the system board; then, press the I/O expansion adapter into the connector.
  6. Firmly press on the I/O expansion adapter to seat the adapter in the connector.
  7. Close the retention clips.
After installing the I/O expansion adapter, complete the following steps:
  1. Install the cover. See Installing the cover for instructions.
  2. Install the PCIe Expansion Node into the chassis. See Installing the PCIe Expansion Node with compute node host for instructions.