Installing a full-height adapter

Use these instructions to install an adapter in the PCIe Expansion Node full-height PCIe riser.

Before installing an adapter in the PCIe Expansion Node full-height PCIe riser, read Safety and Installation guidelines.

Statement 21
Graphic illustrating Safety Statement 21

CAUTION:
Hazardous energy is present when the blade is connected to the power source. Always replace the blade cover before installing the blade.

To install an adapter in the PCIe Expansion Node full-height PCIe riser, complete the following steps:

  1. If the full-height PCIe riser has a high-power PCIe adapter installed with an auxiliary dc power cable, disconnect the auxiliary power cable from the system board (see System board connectors for connector locations).
  2. Grasp the full-height PCIe riser by the blue touch points and pull the PCIe riser straight up to disconnect the riser from the system board connector; then, lift the full-height PCIe riser out of the PCIe Expansion Node.

    Graphic illustrating installing a full-height adapter
  3. Carefully lay the full-height PCIe riser on it's left side on a flat, static-protective surface with the adapter slots facing up.
  4. Remove the filler from the slot where the adapter will be installed.
    Note: If you are installing a double-width full-height adapter, you must remove both fillers from slots 1 and 2. When a double-width adapter is installed in slot 2, slot 1 will not have a filler.
  5. Touch the static-protective package that contains the adapter to any unpainted metal surface on the Flex System Enterprise Chassis or any unpainted metal surface on any other grounded rack component; then, remove the adapter from the package.
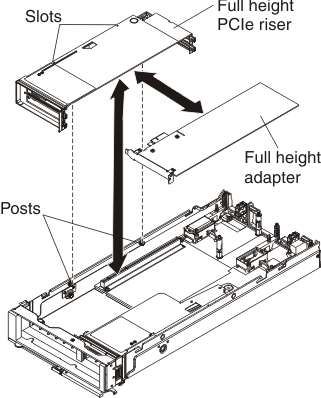
  6. Orient the adapter with the slot in the PCIe riser; then,
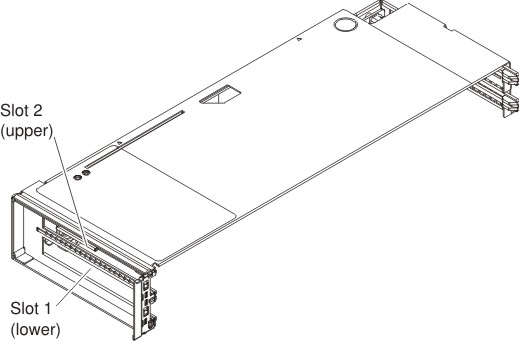
 press the adapter into the slot.
    Note: The full-height PCIe riser has two connectors for PCIe adapters. The lower connector is for adapter slot 1 and the upper connector is for adapter slot 2.

    Graphic illustrating the full-height PCIe adapter slots
  7. Firmly press on the PCIe adapter to seat the adapter in the connector.
    Important: Each adapter slot must have either an adapter or a filler installed.
  8. With the adapter installed, orient the alignment slots on the left side of the full-height PCIe riser to the alignment posts inside the PCIe Expansion Node and slide the PCIe riser over the posts.
  9. Firmly press on the blue touch points to seat the full-height PCIe riser in the system board connector.
  10. If the installed adapters have auxiliary dc power cables, connect the auxiliary power cables to the system board (see System board connectors for connector locations).
After installing the adapter, complete the following steps:
  1. Install the cover. See Installing the cover for instructions.
  2. Install the PCIe Expansion Node into the chassis. See Installing the PCIe Expansion Node with compute node host for instructions.