Use these instructions to remove the low-profile PCIe riser from the PCIe Expansion Node.
Before you remove the PCIe Expansion Node low-profile
PCIe riser, complete the following steps:
- Read Safety and Installation guidelines.
- If the PCIe Expansion Node is installed in a Flex System Enterprise Chassis, remove it (see Removing a PCIe Expansion Node and attached compute node host for instructions).
- Carefully lay the PCIe Expansion Node on a flat, static-protective surface with the right side of the unit oriented toward you.
- Remove the PCIe Expansion Node cover (see Removing the cover for instructions).
Statement 21![]()
CAUTION:
Hazardous energy is present
when the blade is connected to the power source. Always replace the
blade cover before installing the blade.
Important: The low-profile PCIe riser must be installed in the
expansion node or the system will not operate. If the riser is not
installed, the compute node will not power on.
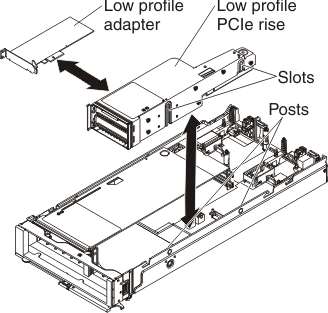
To remove the low-profile PCIe riser, complete the following steps:
- Grasp the low-profile PCIe riser by the blue touch points
and pull the riser straight up to disconnect the riser from the system
board connector; then, lift the low-profile PCIe riser out of the PCIe Expansion Node.
If you are instructed to return the low-profile PCIe riser, follow all packaging instructions, and use any packaging materials for shipping that are supplied to you.