Use these instructions to install and close the cover for the PCIe Expansion Node.
Before installing the PCIe Expansion Node cover,
read Safety and Installation guidelines.
Attention:
- You cannot insert the PCIe Expansion Node into the Flex System Enterprise Chassis until the cover is installed and closed. Do not attempt to override this protection.
- Before you install the cover, make sure that the interposer cable, full-height riser assembly, and low-profile riser assembly are installed and seated correctly, and that there are no loose tools or parts inside the PCIe Expansion Node.
- Air baffles (fillers) must be installed in any empty PCIe slots.
Statement 21![]()
CAUTION:
Hazardous energy is present
when the blade is connected to the power source. Always replace the
blade cover before installing the blade.
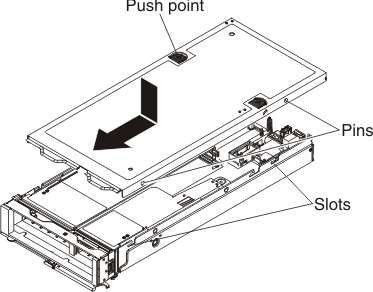
To install and close the PCIe Expansion Node cover, complete the following steps.
- Lower the cover so that the posts inside the cover fit
into the slots in the PCIe Expansion Node,
as shown in the illustration.
After installing the PCIe Expansion Node cover,
complete the following steps:
- Install the compute node cover (see the compute node Installation and Service Guide for instructions).
- Install the 2-bay shelf assembly into the open chassis bays (see Installing the PCIe Expansion Node with compute node host for instructions).