Use this information to remove the front panel.
Before you remove the front panel, complete the following
steps:
- Read Safety and Installation guidelines.
- If the compute node is installed in a chassis, remove it (see Removing a compute node from a chassis for instructions).
- Carefully lay the compute node on a flat, static-protective surface,
orienting the compute node with the bezel pointing toward you.
- Obtain a T8 Torx screwdriver and a 5 mm (3/16-inch) nut driver.
To remove the front panel, complete the following
steps.
-
If you are replacing the front panel, remove
the ID label plate that has machine type and serial number information
from the front panel and set it aside (see Removing the ID label plate).
Note: If your compute node has an RFID tag, it is already attached
to the ID label plate.
-
Remove any storage drives, optional drive
components, and hard disk drive bay fillers and set them aside on
a static-protective surface (see Removing a hot-swap hard disk drive, Removing a 1.8-inch solid state drive, or Removing a solid state drive mounting sleeve.
-
If your compute node has a drive-type-specific storage
drive bezel, such as a 1.8 inch solid-state drive bezel, remove it
and set it aside (see Removing the bezel).
-
Remove the cover and air baffles (see Removing the compute node cover).
-
Carefully place the compute node to the up-side-down orientation.
-
Using a 5 mm (3/16-inch) nut driver, remove the two nuts
from the KVM connector.
-
Rotate the customer information and network access tags
to the open position.
-
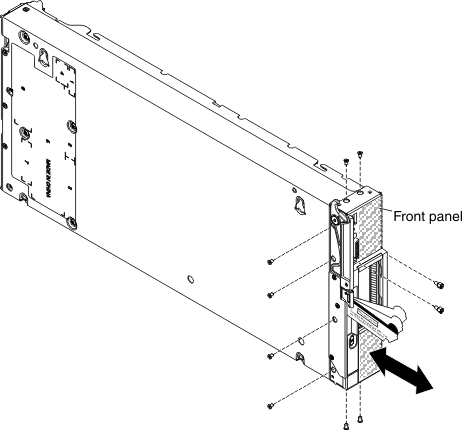
Using a T8 Torx screwdriver, remove the four screws that
secure the front panel to the bottom of the compute node chassis.
One of the screws is accessed through a hole in the tag retainer.
-
Carefully return the compute node to the bottom-side-down
orientation.
-
Using a T8 Torx screwdriver, remove the two screws that
secure the front panel from each side of the compute node chassis
(four screws, total).
-
Carefully slide the front panel forward and away from the
compute node chassis.
If you are instructed to return the front panel, follow
all packaging instructions, and use any packaging materials for shipping
that are supplied to you.