Use this information to install the base assembly.
Before you begin
- This procedure should be performed only by trained service technicians.
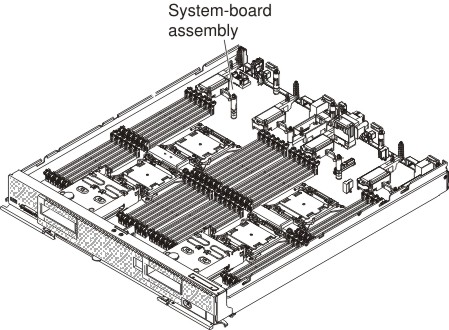
- The base assembly includes the chassis and system board.
Before you install the base assembly, complete the following
steps:
- Read Safety and Installation guidelines.
- If the compute node is installed in an Flex System chassis, remove it (see Removing a compute node from a chassis for instructions).
- Carefully lay the compute node on a flat, static-protective surface, orienting the compute node with the bezel pointing toward you.
- Obtain the following items for use during the replacement procedure
(see Parts listing, Types 7917, 7167, 2590 and 2584):
- Alcohol wipes
- Bezel
- Thermal grease
About this task
Important: When you replace the base assembly,
you must update the compute node with the latest firmware or restore
the preexisting firmware. Make sure that you have the latest firmware
or a copy of the preexisting firmware before you proceed. See Updating firmware and device drivers for more information.
Procedure
To install the components on the system board of the new base assembly, complete the following steps.
-
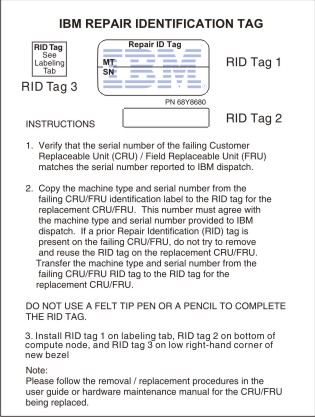
The new base assembly comes with an IBM Repair Identification
(RID) tag. Using a ball point pen, transfer the machine type and serial
number from the old base assembly to the two labels on the IBM Repair
Identification tag; then, place Tag 1 on the label tab (see Installing a compute node in a chassis) and Tag 2 on the
bottom of the base assembly. If you installed the new bezel on the
new base assembly because the old bezel was damaged and did not transfer
the Tag from the old bezel to the new bezel, install Tag 3 on the
lower right corner of the new bezel. If you installed the old bezel
on the new base assembly or transferred the Tag from the old bezel
to the new bezel, discard Tag 3.
What to do next
- Install the cover onto the compute node (see Installing the compute node cover for instructions).
- Install the compute node into the chassis (see Installing a compute node in a chassis for instructions).
- Use the CMM Web Interface to restore the IP address of the compute
node IMM. See for more
information. Note: If you configured static IP addresses, you will not be able to access the node remotely or from the FSM until the IP address of the IMM is restored.
- Update the Universal Unique Identifier (UUID) and the Vital Product Data (VPD). Use the Advanced Settings Utility to update the UUID and VPD in the UEFI-based compute node (see Updating the Universally Unique Identifier and DMI/SMBIOS data).
- Update the compute node with the latest firmware or restore the preexisting firmware that the customer provides (see Updating firmware and device drivers for more information).