Use this information to remove a fabric connector.
Before you begin
Before you remove the
fabric connector,
complete the following steps:
- Read Safety and Installation guidelines.
- If the compute node is installed in a chassis, remove it (see Removing a compute node from a chassis for instructions).
- Carefully lay the compute node on a flat, static-protective surface,
orienting the compute node with the bezel pointing toward you.
- Obtain a #1 Phillips screwdriver.
About this task
When you remove the
fabric connector,
the UEFI firmware holds the Ethernet controller in reset and displays
a warning message, if an I/O expansion adapter is not installed in
the I/O expansion connector 1 to provide connectivity to the chassis.
Procedure
To remove a fabric connector,
complete the following steps.
-
Remove the cover (see Removing the compute node cover).
-
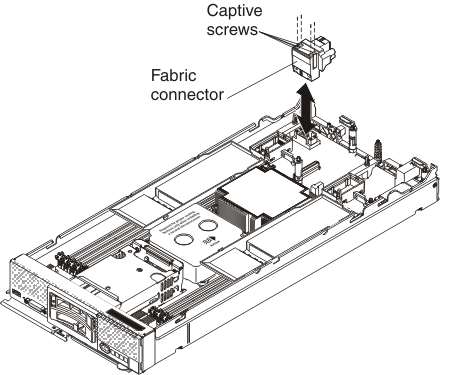
Locate the fabric connector
on the system board (see System-board layouts).
-
Using a #1 Phillips screwdriver, loosen the
four captive screws that secure the fabric connector.
-
Lift the fabric connector
from the system board and store it in a safe place.
What to do next
If you are instructed to return the
fabric connector,
follow all packaging instructions, and use any packaging materials
for shipping that are supplied to you.
If you have removed the fabric connector
to install an I/O expansion adapter in I/O expansion connector 1,
keep the fabric connector
in a safe place for future use.