Use this information to install an I/O expansion adapter.
Before you begin
- Read Safety and Installation guidelines.
- If the compute node is installed in a chassis, remove it (see Removing a compute node from a chassis for instructions).
- Carefully lay the compute node on a flat, static-protective surface, orienting the compute node with the bezel pointing toward you.
About this task
This component can be installed as an optional device or as a CRU. The installation procedure is the same for the optional device and the CRU.
The optional IBM Flex System PCIe Expansion Node supports additional PCIe adapters and I/O expansion adapters to provide a cost-effective way for you to increase and customize the capabilities of the compute node. For additional information, see PCIe Expansion Node.
Procedure
To install an I/O expansion adapter, complete the following steps:
- Remove the cover (see Removing the compute node cover).
- Locate the I/O expansion connectors (see System-board connectors).
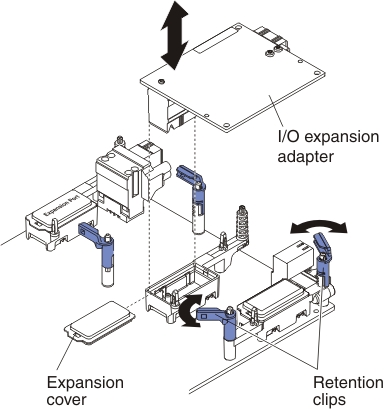
- Remove the expansion cover from the connector, if one is present.
- Touch the static-protective package that contains the expansion adapter to any unpainted metal surface on the IBM Flex System chassis or any unpainted metal surface on any other grounded rack component; then, remove the expansion adapter from the package.
- Open the retention clips.
- Orient the connector on the expansion adapter with the I/O expansion connector and alignment pins on the system board; then, press the adapter into the I/O expansion connector.
- Firmly press on the indicated locations to seat the expansion adapter in the connector and over the alignment pins.
- Close the retention clips.
What to do next
- Install the cover onto the compute node (see Installing the compute node cover for instructions).
- Install the compute node into the chassis (see Installing a compute node in a chassis for instructions).
- See the documentation that comes with the expansion adapter for device-driver and configuration information to complete the installation.