Use this information to remove a flash DIMM.
Before you begin
Before you remove a flash DIMM, complete the following steps:
- Read Safety and Installation guidelines.
- If the compute node is installed in an Flex System chassis,
remove it (see Removing a compute node from a chassis for
instructions).
- Carefully lay the compute node on a flat, static-protective surface,
orienting the compute node with the bezel pointing toward you.
Procedure
To remove a flash DIMM, complete the following steps.
-
Remove the cover (see Removing the compute node cover).
-
Remove the air baffle that is installed over the DIMM connector.
-
Locate the DIMM connectors (see System-board connectors). Determine which flash
DIMM you want to remove from the compute node.
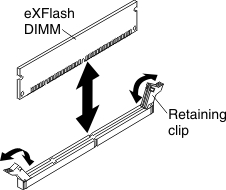
Attention: To avoid breaking the retaining clips or damaging
the DIMM connectors, handle the clips gently.
-
Make sure that both retaining clips on the DIMM connector
from which you are removing the flash DIMM are in the open position.
-
Pull the flash DIMM out of the connector.
-
If you are not immediately replacing the flash DIMM, install
the air baffle.
Attention:
- Install the air baffles with the arrow indicating air flow direction
pointing to the rear of the compute node.
- To maintain proper system cooling, do not operate the compute
node without air baffles installed over the DIMM connectors.
What to do next
If you are instructed to return the flash DIMM, follow
all packaging instructions, and use any packaging materials for shipping
that are supplied to you.