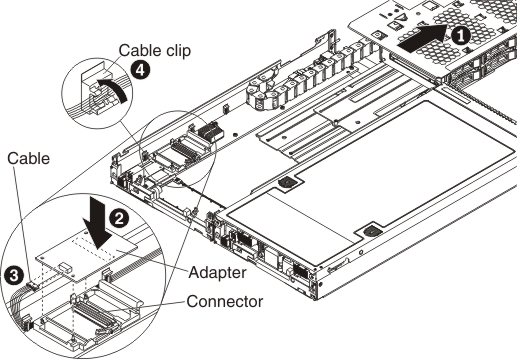
Use these instructions to install a replacement flash/RAID adapter in the storage expansion node.
Before you install the flash/RAID adapter, read Safety and Installation guidelines.
To install a flash/RAID adapter, complete the following steps.

Attention: Make sure that the drive drawer is supported when it is open. The weight of installed drives can cause the storage expansion node assembly to be unstable when the drive drawer is open.
- With the drive drawer open approximately 30 cm (12 in.), touch the static-protective package that contains the adapter to any unpainted metal surface on the Flex System Enterprise Chassis or any unpainted metal surface on any other grounded rack component; then, remove the adapter from the package.
- Orient the adapter with the connector on the system board; then, firmly press on the indicated location on the adapter until the blue latch snaps up and over the edge of the adapter.
- Connect the cable to the adapter. The connector is keyed to prevent incorrect insertion.
- Make sure that the cable is secured in the cable clip on the inside wall of the storage expansion node.
After you install the flash/RAID adapter, complete the following steps:
- Close the drive drawer.
- Install the cover on the storage expansion node (see Installing the cover on the storage expansion node for instructions).
- Install the storage expansion node assembly into the chassis (see Installing the storage expansion node in an Flex System Enterprise Chassis for instructions).