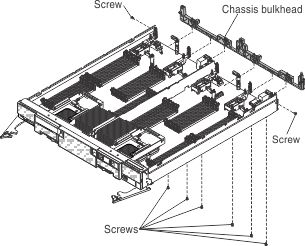
Use this information to install the chassis bulkhead.
Before you begin
Note: This procedure should be performed only by trained service
technicians.
Before you install the chassis bulkhead, complete
the following steps:
- Read Safety and Installation guidelines.
- If the compute node is installed in an Flex System chassis,
remove it (see Removing a compute node from a chassis for
instructions).
- Carefully lay the compute node on a flat, static-protective surface,
orienting the compute node with the bezel pointing toward you.
Procedure
To install the chassis bulkhead, complete the following
steps.

-
Remove the cover (see Removing the compute node cover).
-
Remove the air baffles.
-
Remove the center partition (see Removing the center partition).
-
Remove the fabric connectors
(see Removing a fabric connector).
-
Position the bulkhead in the chassis.
-
Using a T8 Torx screwdriver, install the screws that secure
the bulkhead to the sides of the chassis.
-
Carefully place the chassis on the side with the front
handle side up.
-
Using a T8 Torx screwdriver, install the screws that secure
the bulkhead to the bottom of the chassis.
-
Carefully return the chassis to the bottom-side-down orientation.
-
Install the fabric connectors
(see Installing a fabric connector).
-
Install the center partition (see Installing the center partition).
-
Install the air baffles.
Attention: Install
the air baffles with the arrow indicating air airflow direction pointing
to the rear of the compute node.
Attention: To maintain
proper system cooling, do not operate the compute node without the
center partition installed in the compute node and the air baffles
installed over the DIMM connectors.
What to do next
After you install the chassis bulkhead, complete the following
steps:
- Install the cover onto the compute node (see Installing the compute node cover for instructions).
- Install the compute node into the chassis (see Installing a compute node in a chassis for instructions).
