Use these instructions to remove a hot-swap drive from the storage expansion node.
Before you remove a hot-swap drive, complete the following steps:
- Read Safety and Installation guidelines.
- See the illustration in Drive drawer for the locations of the drive bays.
- Back up all important data before you make changes to drives.
Attention: To ensure proper cooling and protect system
data integrity, do not operate the storage expansion node for
an extended period of time with the drive drawer open. Keep the drive
drawer closed when you are not installing or removing drives.
To remove a hot-swap drive, complete the following steps.
- Open the drive drawer as far as necessary to access the drive that you want to remove.
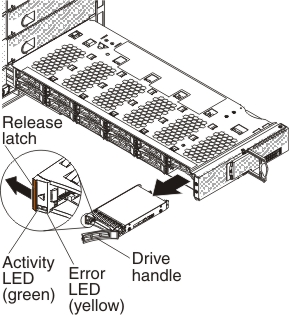
- Press the orange release latch on the drive to release the drive handle.
- Pull the drive handle to remove the drive from the bay.
- Close the drive drawer.
If you are instructed to return the drive, follow all packaging instructions, and use any packaging materials for shipping that are supplied to you. If you are installing a replacement drive, continue to Replacing a hot-swap drive.