The storage expansion node comes attached to the expansion shelf. You must attach a compute node to the expansion shelf and connect the interposer cable to the compute node.
Attention: Before you connect a compute
node to the storage expansion node,
you must make sure that the integrated management module II (IMM2)
primary and backup firmware in the compute node is at level ibm_fw_imm2_1aoo34x-1.xx_anyos_noarch
or later. If the IMM2 firmware in the compute node is at an earlier
level when you connect the compute node to the storage expansion node, the
firmware in the storage expansion node will
become corrupted and unrecoverable, and you will have to replace
the storage expansion node.
For information about updating the firmware in the compute node, see
the compute node Installation and Service Guide.
Before you attach a compute node to the expansion shelf, complete the following steps:
- Read Safety and Installation guidelines.
- If the compute node is installed and operating, complete the following
steps:
- Shut down the operating system, and press the power button to turn off the compute node (see the compute node Installation and Service Guide for instructions).
- Remove the compute node from the Flex System Enterprise Chassis (see the compute node Installation and Service Guide for instructions).
- Make sure that the compute node has two microprocessors, if that configuration is required for the compute node to work with the storage expansion node. To determine whether a supported compute node requires two microprocessors, see Supported compute nodes.
- Make sure that the integrated management module II (IMM2) primary
and backup firmware is at level ibm_fw_imm2_1aoo34x-1.xx_anyos_noarch
or later.Attention: If the IMM2 firmware in the compute node is at an earlier level when you connect the compute node to the storage expansion node, the firmware in the storage expansion node will become corrupted and unrecoverable, and you will have to replace the storage expansion node.
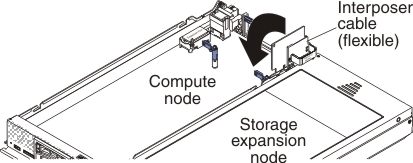
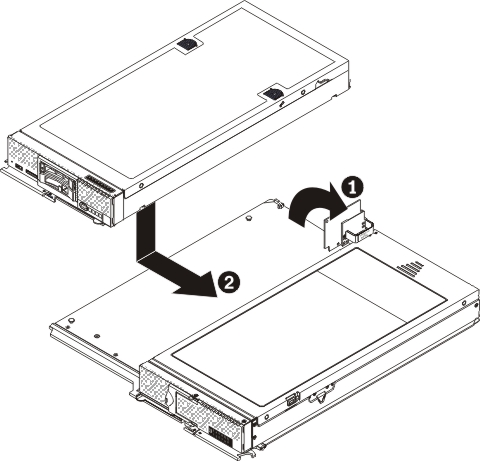
To attach a compute node to the expansion shelf, complete the following steps.
- Connect the interposer cable to the interposer connector
on the compute node system board, as shown in the following illustration.