Use this information to remove a simple-swap hard disk drive. The Flex System x222 Compute Node can use 2.5-inch simple-swap hard disk drives of either the standard or solid-state drive (SSD) design. Simple-swap hard disk drives can be installed in both the upper and lower compute nodes.
Important: Simple-swap hard disk drives
are not hot-swap devices and must be removed or installed with the
compute node turned off. For information about removing optional 1.8-inch
hot-swap solid-state drives, see Removing a solid state drive.
Before you remove a simple-swap hard disk drive, complete the following steps.
- Back up all important data before you make changes to hard disk drives.
- Read Safety and Installation guidelines.
- If the compute node where you are removing the simple-swap hard disk drive is operating, shut down its operating system.
- Press the power button to turn off the compute node where you are removing the simple-swap hard disk drive (see Turning off a compute node for more information).
To remove a simple-swap hard disk drive, complete the
following steps.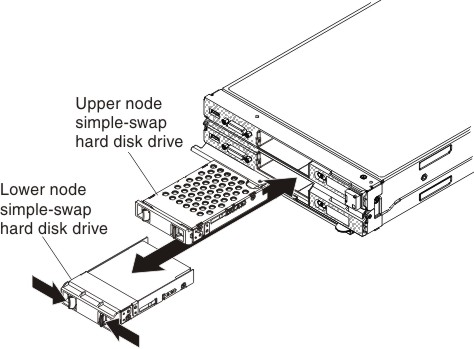
- Press the release latches toward the center of the hard disk drive.
- Slide the drive away from the compute node and remove it from the bay.
If you are instructed to return a hard disk drive, follow all packaging instructions, and use any packaging materials for shipping that are supplied to you.