Creating an array using the integrated ServeRAID C105 controller

Use these instructions to configure a software RAID array on the Flex System x220 Compute Node using the integrated ServeRAID C105 controller.

Important: You must create the software RAID array before you install the operating system on the compute node.

The ServeRAID C105 is an integrated function of the system board, no additional hardware is required. You cannot enable or disable the ServeRAID C105 controller using the Setup utility. The ServeRAID C105 controller is always enabled in the x220 compute node, unless an optional RAID controller is installed. You can use the Setup utility to configure the controller, configure drive groups and virtual drives, and to perform other configuration tasks in a pre-boot environment. The ServeRAID C105 takes control of all devices that are connected to the system board SATA ports.

To create a software RAID array using the integrated ServeRAID C105 controller, complete the following steps.

  1. Start the compute node Setup utility. See Using the Setup utility for instructions.
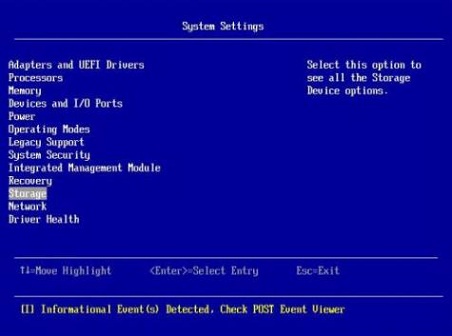
  2. Under System Settings, select Storage.

    The following illustration shows the Setup utility main menu.

    System Settings screen with Storage highlighted
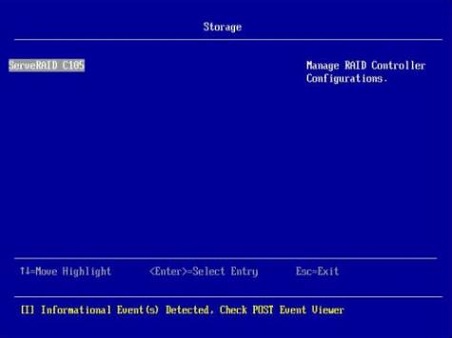
  3. Under Storage, select ServeRAID C105.

    The following illustration shows the Setup utility main menu.

    Storage screen with ServeRAID C105 selected
  4. Under Configuration Options, select Virtual Drive Management > Create Configuration.
  5. On the Create Configuration screen, select the RAID level for the array that you want to create:
    • RAID0 is the only option available if there is just one hard disk drive installed.
    • RAID0 and RAID1 are available if two hard disk drives are installed.
  6. On the Create Configuration screen, select Select Drives. The Select Drives screen is displayed.
  7. On the Select Drives screen, scroll down to Choose Unconfigured Drives and highlight the drive you want to use. Press the spacebar to select the drive. An X appears to indicate that the drive has been selected. Repeat this step for the second drive if you are configuring a RAID1 array.
  8. On the Select Drives screen, select Apply Changes to create the array.
  9. When the Success prompt is displayed, select OK to continue.
  10. After the system returns to the Create Configuration screen, select Save Configuration.
    Note:
    1. You must save the virtual drive configuration before exiting the Setup utility.
    2. If you return to the Select Drives screen, your drive selections will be deleted.
  11. When the prompt Creating Virtual Drives will cause the data lost on the associated Drives to be permanently deleted. is displayed, select Yes to continue.
  12. When the Success prompt is displayed, select OK to continue.
  13. RAID1 only: To initialize the virtual disk, select ServeRAID C105 > Virtual Drive Management > Select Virtual Drive Operations.
    Note: These steps are not required for RAID0.
    1. Under Virtual Drive Operation, choose Select Operation. Select the type of initialization you want to use.
    2. Select Start Operation.
    3. Select Yes to confirm.
    4. When the Success prompt is displayed, select OK to continue.
Notes:
  1. For more information about ServeRAID C105, see the ServeRAID-M matrix.
  2. ServeRAID C105 is not supported in VMware 5 and VMware 4.1.
  3. ServeRAID C105 is not supported in solid-state drives.
  4. ServeRAID C105 is not supported in legacy configuration.
  5. ServeRAID C105 is automatically disabled when ServeRAID H1135 is installed.