Use this information to install an I/O expansion adapter.
Before you install an I/O expansion adapter, complete the
following steps:
- Read Safety and Installation guidelines.
- If the compute node is installed in a Lenovo Flex System chassis, remove it (see Removing a compute node from a chassis for instructions).
- Carefully lay the compute node on a flat, static-protective surface, orienting the compute node with the bezel pointing toward you.
The following notes describe information
that you must consider when you install an I/O expansion adapter:
- This component can be installed as an optional device or as a CRU. The installation procedure is the same for the optional device and the CRU.
- Install the ServeRAID M5115 controller in I/O expansion connector 3 only.
- The following adapters are supported only in I/O expansion connector
1 and connector 2:
- Flex System CN4054 10 Gb Virtual Fabric Adapter
- Flex System CN4058 8-port 10 Gb Virtual Fabric Adapter
- Flex System EN2024 4-port 1 Gb Ethernet Adapter
- Flex System FC5054 4-port 16 Gb FC Adapter
- To consider any maximum I/O limitations for the Flex System x480 X6 and x880 X6 compute node, see http://www.ibm.com/systems/info/x86servers/serverproven/compat/us/nos/flexmatrix.shtml.
If your adapter was previously configured, backup or record its configuration information, if possible, before replacing the adapter. See the documentation for your adapter for information and instructions.
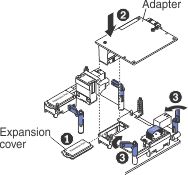
To install an I/O expansion adapter, complete the following steps.
After you install the I/O expansion adapter, complete the
following steps:
- Install the cover onto the compute node (see Installing the compute node cover for instructions).
- Install the compute node into the chassis (see Installing a compute node in a chassis for instructions).
- See the documentation that comes with the expansion adapter for device-driver and configuration information to complete the installation.