Use this information to install a hot-swap hard disk drive.
Before you install the hot-swap hard disk drive, read Safety and Installation guidelines.
The compute node has two SAS or SATA hard disk drive bays for installing hot-swap hard disk drives, such as hot-swap SAS hard disk drives. The compute node supports using RAID 0 or RAID 1 when two hard disk drives of the same interface type are installed. See Configuring a RAID array for information about RAID configuration.
To install a hot-swap hard disk drive or hard disk drive bay filler, complete the following steps.
- Identify the hard disk drive bay (hard disk drive bay 0 or hard disk drive bay 1) in which you plan to install the hot-swap hard disk drive.
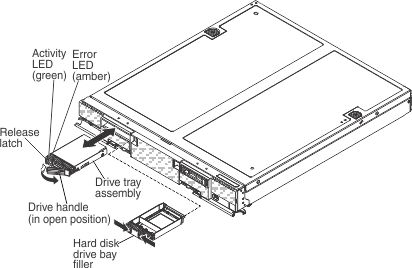
- If a hard disk drive bay filler is installed, remove it from the compute node by pressing together the release latches and sliding the filler away from the compute node.
- Touch the static-protective package that contains the hot-swap hard disk drive to any unpainted metal surface on the Lenovo Flex System chassis or any unpainted metal surface on any other grounded rack component; then, remove the hard disk drive from the package.
- Open the release lever on the hot-swap hard disk drive and slide the drive into the bay until it is firmly seated in the connector.
- Lock the hot-swap hard disk drive into place by closing the release lever.
- Check the hard disk drive status LEDs to make sure that the hard disk drive is operating correctly.
See Configuring a RAID array for information
about SAS RAID configuration.